KayDubbya
Paddler
- Joined
- Mar 22, 2008
- Messages
- 343
Or: How I Learned to Stop Worrying and Love the Steam Box
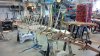
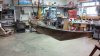
After following, with great interest, a number of other members SOF projects I got inspired to finally bite the bullet and start my own Skin-on-Frame kayak. I have access to a pretty well equipped workshop that my Father-in-law has assembled from decades of farming. I also have a good relationship with a local cedar mill so I am able to get really good quality, straight grain cedar quite easily. I also found myself with some free time over the Christmas holidays so I was confident that I could get something built over the course of a couple weeks. My goal was to build a Greenland style kayak that would be used almost exclusively for rolling. I have an excellent touring boat, so I was not overly concerned about speed, tracking and certainly not cargo volume. I am also somewhat “rough” with my toys, so I had planned to beef up certain parts of the boat for extra strength. Weight wasn’t a huge concern but I knew that working with Western red Cedar would make for a lightweight craft. What follows is not so much of a “How to”, but more of a “How Not To” and while it may not serve as much of an inspiration to anyone, it could perhaps serve as a warning. I’ve also tried to highlight some of the information that didn’t seem to have been addressed by the many build reports I read online.
Building Guide:
My reference guide for the most part was Christopher Cunnigham’s book “Building the Greenland Kayak - A Manual for Its Construction and Use”. I found the book to filled with a ton of information on building, but his instructions for specific parts of the build are sometimes scattered throughout the book. I’m used to Ikea style directions, where a picture of the part, a description of the part, the dimensions of the part and the assembly of the part are all on the same page. You won’t find that in this book. There are two incredibly comprehensive build threads on this forum that were far more useful than relying solely on Cunnigham’s book. I also refered back to the instructables.com website which has an interesting method for building SOF kayaks. It was every bit as crude as I expected my first build to be, so I knew I would be in good company, regardless of the eventual outcome.
Lumber Selection:
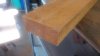
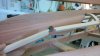
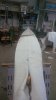
Having access to good quality lumber is usually considered a cornerstone of SOF construction. I’ve been dealing with a local cedar mill for ten years as part of my house construction business, so the owner is very accommodating about letting me pick out CVG (clear, vertical grain) Western Red Cedar. He will even pull aside boards for me that I have used for paddle building on several occasions. I really like working with WRC; it’s lightweight, easy to carve, naturally rot resistant and smells great while working with it. When I asked my supplier to start watching for some 16’ - 18’ lengths for building a full boat, he offered to cut the boards for me out of a few sizeable logs. After picking through the trees, I asked for the them to be cut to my rough lengths and dimensions and arranged to pick them up the following week. All told I spent $198 for three 17’ lengths of 2” x 4”, four 8 foot lengths of 2” x 6” and two 6’ lengths of 2” x 8” Western Red Cedar. While that may seem like a considerable amount to pay, I still have enough left over to build two more kayaks, so my lumber budget for the first one is probably in the $75 - $100 range.
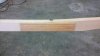
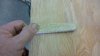
One of the downsides to having wood cut to special order, is that you’re stuck with it once it’s cut. Upon inspection of the finished product I found that what appeared to be nearly perfect wood on three sides can have sizeable defects internally that don’t appear until the wood goes through a band saw. Of my three 17’ long 2 x 4’s all three had some sort of defect that would have to be coped with at some point. I picked the one with the smallest defect and it would serve as my gunwales. I began by taking about 6 inches off of the overall length to deal with the worst of the knots in that board. My first “compromise” of many.
Gunwale Construction:
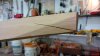
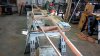
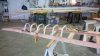
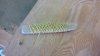
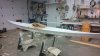
My experience with boat or kayak construction up to this point is almost zero. I have built several Greenland Paddles over the past few years, but this was certainly more complex than spokeshaving a 2x4 into a somewhat symmetrical stick. The first several days of workshop time are spent making and re-making jigs and forms that “streamline” and “simplify” (yeah, right!) the repetitive parts of the build. All told, 11 pairs of deck beam mortices had to be cut at a 20 Degree angle into the sides of the gunwales and 24 pairs of rib mortices had to be routered into the bottom of the gunwales. If you don’t have a proper plunge router you can use a basic laminate trimmer with a flush cutting router bit, but it’s imperative that you find a way to cut each mortice to the same depth. You’ll thank yourself later. I found that you could “fix” a mis-located rib mortice by gluing in a plug, cut to the same size as the offending hole, and then re-drilling the rib mortice. Since the rib mortices all face down, you’ll likely never see the repair. This became my mantra; “If I can’t see the mistake, it really isn’t a mistake. It’s experience”.
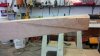
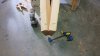
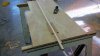
Another important tip, though it may seem obvious to experience boat builders, is to make sure you turn the gunwales right side up BEFORE you saw the beveled ends off. However, if you decide to forge on anyways, (without re-cutting your gunwales, redrawing your deck beam and rib locations, routing out the rib mortices for a second time and re-drilling and filing all of your deck beam mortices again) there is an effective fix. If you haven’t sawn completely through the upsidedown gunwales install and glue a thin fillet of wood in the saw kerf. I’ll reiterate, “if i can’t see it, it may not have happened”. Some builders recommend cutting both pairs of rib mortices into a single 2” wide board which is then split down the middle, into the two matching gunwales. The big advantage to this method is that your rib mortices and deck beam locations should line up perfectly (if your router jig is any good) and that your boards will have an even amount of flex to them (as they come from the same part of the same tree). The big disadvantage to this method is that screwing up one part of a gunwale means that you now have to restart BOTH gunwales. Or not...
It was about this point that I reconciled with myself that I was now building a Greenland “Inspired” kayak, not a “Traditional” Greenland kayak. I was utterly justified using polyurethane Gorilla Glue to fix the odd wart because I was also relying on the most modern tools, and even materials, to build this thing. Ballistic nylon skin, Spirit Line Poly-urethane coating, electric planers, laser levels, Internet forums: No native builder ever had access to these, so how could I claim to be building a “traditional” kayak. It was time to go “all in” with technology and just get through it. After all, the NEXT one could be “traditional”
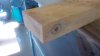
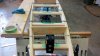
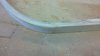
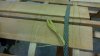
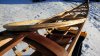
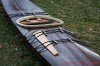
The knot hole in the stern gunwale was reinforced with a small plate, glued and clamped over the defect. I installed a matching plate on the opposite side gunwale so the flexibility of each board would match. I didn’t want the gunwales to have an un-even bend on one side, as this could affect the straightness of the frame. More on this later…
After following, with great interest, a number of other members SOF projects I got inspired to finally bite the bullet and start my own Skin-on-Frame kayak. I have access to a pretty well equipped workshop that my Father-in-law has assembled from decades of farming. I also have a good relationship with a local cedar mill so I am able to get really good quality, straight grain cedar quite easily. I also found myself with some free time over the Christmas holidays so I was confident that I could get something built over the course of a couple weeks. My goal was to build a Greenland style kayak that would be used almost exclusively for rolling. I have an excellent touring boat, so I was not overly concerned about speed, tracking and certainly not cargo volume. I am also somewhat “rough” with my toys, so I had planned to beef up certain parts of the boat for extra strength. Weight wasn’t a huge concern but I knew that working with Western red Cedar would make for a lightweight craft. What follows is not so much of a “How to”, but more of a “How Not To” and while it may not serve as much of an inspiration to anyone, it could perhaps serve as a warning. I’ve also tried to highlight some of the information that didn’t seem to have been addressed by the many build reports I read online.
Building Guide:
My reference guide for the most part was Christopher Cunnigham’s book “Building the Greenland Kayak - A Manual for Its Construction and Use”. I found the book to filled with a ton of information on building, but his instructions for specific parts of the build are sometimes scattered throughout the book. I’m used to Ikea style directions, where a picture of the part, a description of the part, the dimensions of the part and the assembly of the part are all on the same page. You won’t find that in this book. There are two incredibly comprehensive build threads on this forum that were far more useful than relying solely on Cunnigham’s book. I also refered back to the instructables.com website which has an interesting method for building SOF kayaks. It was every bit as crude as I expected my first build to be, so I knew I would be in good company, regardless of the eventual outcome.
Lumber Selection:
Having access to good quality lumber is usually considered a cornerstone of SOF construction. I’ve been dealing with a local cedar mill for ten years as part of my house construction business, so the owner is very accommodating about letting me pick out CVG (clear, vertical grain) Western Red Cedar. He will even pull aside boards for me that I have used for paddle building on several occasions. I really like working with WRC; it’s lightweight, easy to carve, naturally rot resistant and smells great while working with it. When I asked my supplier to start watching for some 16’ - 18’ lengths for building a full boat, he offered to cut the boards for me out of a few sizeable logs. After picking through the trees, I asked for the them to be cut to my rough lengths and dimensions and arranged to pick them up the following week. All told I spent $198 for three 17’ lengths of 2” x 4”, four 8 foot lengths of 2” x 6” and two 6’ lengths of 2” x 8” Western Red Cedar. While that may seem like a considerable amount to pay, I still have enough left over to build two more kayaks, so my lumber budget for the first one is probably in the $75 - $100 range.
One of the downsides to having wood cut to special order, is that you’re stuck with it once it’s cut. Upon inspection of the finished product I found that what appeared to be nearly perfect wood on three sides can have sizeable defects internally that don’t appear until the wood goes through a band saw. Of my three 17’ long 2 x 4’s all three had some sort of defect that would have to be coped with at some point. I picked the one with the smallest defect and it would serve as my gunwales. I began by taking about 6 inches off of the overall length to deal with the worst of the knots in that board. My first “compromise” of many.
Gunwale Construction:
My experience with boat or kayak construction up to this point is almost zero. I have built several Greenland Paddles over the past few years, but this was certainly more complex than spokeshaving a 2x4 into a somewhat symmetrical stick. The first several days of workshop time are spent making and re-making jigs and forms that “streamline” and “simplify” (yeah, right!) the repetitive parts of the build. All told, 11 pairs of deck beam mortices had to be cut at a 20 Degree angle into the sides of the gunwales and 24 pairs of rib mortices had to be routered into the bottom of the gunwales. If you don’t have a proper plunge router you can use a basic laminate trimmer with a flush cutting router bit, but it’s imperative that you find a way to cut each mortice to the same depth. You’ll thank yourself later. I found that you could “fix” a mis-located rib mortice by gluing in a plug, cut to the same size as the offending hole, and then re-drilling the rib mortice. Since the rib mortices all face down, you’ll likely never see the repair. This became my mantra; “If I can’t see the mistake, it really isn’t a mistake. It’s experience”.
Another important tip, though it may seem obvious to experience boat builders, is to make sure you turn the gunwales right side up BEFORE you saw the beveled ends off. However, if you decide to forge on anyways, (without re-cutting your gunwales, redrawing your deck beam and rib locations, routing out the rib mortices for a second time and re-drilling and filing all of your deck beam mortices again) there is an effective fix. If you haven’t sawn completely through the upsidedown gunwales install and glue a thin fillet of wood in the saw kerf. I’ll reiterate, “if i can’t see it, it may not have happened”. Some builders recommend cutting both pairs of rib mortices into a single 2” wide board which is then split down the middle, into the two matching gunwales. The big advantage to this method is that your rib mortices and deck beam locations should line up perfectly (if your router jig is any good) and that your boards will have an even amount of flex to them (as they come from the same part of the same tree). The big disadvantage to this method is that screwing up one part of a gunwale means that you now have to restart BOTH gunwales. Or not...
It was about this point that I reconciled with myself that I was now building a Greenland “Inspired” kayak, not a “Traditional” Greenland kayak. I was utterly justified using polyurethane Gorilla Glue to fix the odd wart because I was also relying on the most modern tools, and even materials, to build this thing. Ballistic nylon skin, Spirit Line Poly-urethane coating, electric planers, laser levels, Internet forums: No native builder ever had access to these, so how could I claim to be building a “traditional” kayak. It was time to go “all in” with technology and just get through it. After all, the NEXT one could be “traditional”
The knot hole in the stern gunwale was reinforced with a small plate, glued and clamped over the defect. I installed a matching plate on the opposite side gunwale so the flexibility of each board would match. I didn’t want the gunwales to have an un-even bend on one side, as this could affect the straightness of the frame. More on this later…